
Using a White Sheet
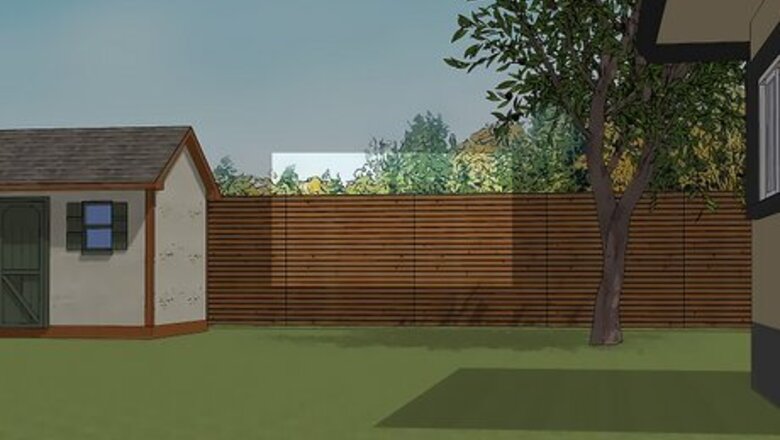
Choose the wall or area you want to place your screen on. You can use a white sheet for an indoor or outdoor projector screen, but it’s an especially good choice for backyard setups. Make sure to place your screen somewhere where you’ll have plenty of room for seating, whether audience members are seated on blankets or chairs. If placing your DIY projector screen outdoors, take into account any streetlights or porch lights that may shine onto your screen. If you have any weather concerns, allow enough space to place an event tent or other weather shelter over your screen and seating area. Using a white sheet projector screen indoors will give you the best image quality, but choose the room with the least amount of natural light. Try standing in your chosen room, closing the door, and turning off the lights. Note any significant light seepage coming in from the outside and adjust accordingly.
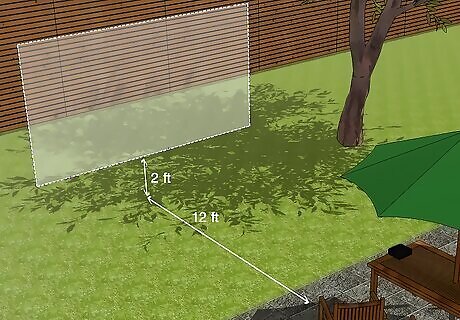
Measure the dimensions of your projector screen. Determine the best height for your screen by multiplying ⅙ by the distance from your screen to the farthest chair or seating area. Calculate the distance between your projector and your screen by determining your projector’s throw distance. Most projectors have a throw ratio of 2.0. In this case, the projector needs to be 2 feet (0.61 m) away from the screen for each 1 foot (0.30 m) of image width. If you’re unsure, use this projector throw distance calculator to figure out how far from the screen your projector should sit. If you’re using your screen indoors, make sure your chosen room has enough space to allow for the necessary dimensions of your projector screen.
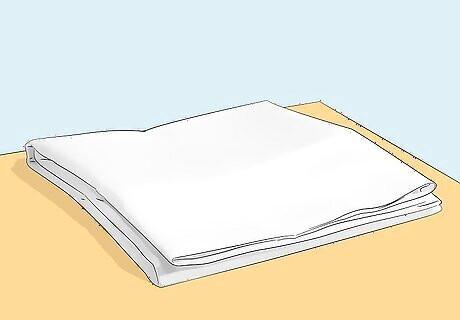
Choose your screen materials. Use one twin or full-size white sheet without any patterns or prints. Add a dark backing material to reduce the amount of light peeking through the white sheet. You can use a black bed sheet, or another dark material like a blackout curtain. Sew together the white and dark sheets or secure them with safety pins. White sheets with higher thread counts will give you better image quality, although you can also fold over or hang multiple low-thread count sheets for the same results. You can also use a white tarp for outdoor or more casual movie screenings. Tarps are weather-resistant, durable, and cheap. However, tarps may show wrinkles or reduce the brightness of your film—make sure to pull the tarp taut and smooth out any large wrinkles.

Mount your screen. Depending on the area you plan to hang your sheet in, there are several options for installation. One method is to install a curtain rod or tension rod and fasten the sheet over the rod with large towel clips. Alternatively, you can add grommets to the perimeter of the sheet and use bungee cords, hooks, or other hanging instruments to secure the sheet.
Making a Painted Screen
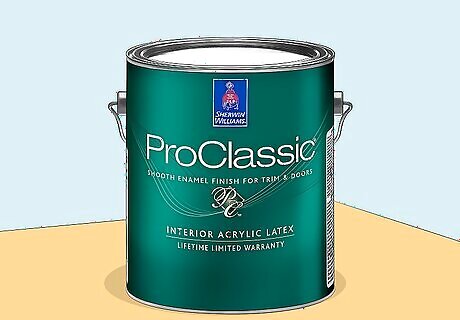
Find the right paint. Use a non-reflective, extra white paint like the Sherwin-Williams ProClassic Smooth Enamel Satin Extra White shade. You can also purchase projector screen paint specially made for these DIY projects. Light gray paint may also be a good choice for a room that has a lot of ambient light, as a gray background will provide a higher contrast for your projected image. Since the main surface of this projector screen will be a painted surface, it’s critical that you get the right type of paint. Using the wrong type of paint can result in reduced or altered image quality. Make sure your paint is recommended for the surface you’ll be using it on before proceeding.
Paint the wall. Before you paint the screen, paint the entire wall behind it to create more contrast. Turn on your projector and position it to where you want the image to be on the wall. Mark off the inside area of where your projected image will be. Paint the wall around this border, leaving the screen area for later. Use a paint that is non-reflective and darker than your screen paint.

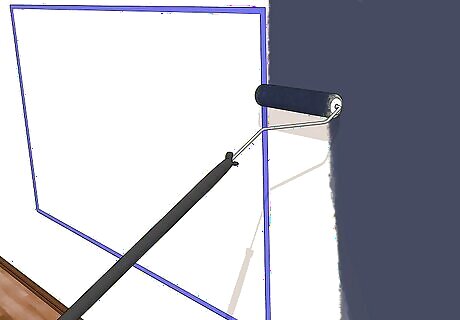
Paint the screen. After your walls have been painted, you can begin painting the screen itself. Take your time and make sure everything is where you want it before you begin creating the screen. Keep some of the following tips in mind as you paint your screen: Move your painter’s tape to the outside border of your screen. Use sandpaper to sand the area and make sure the wall surface is flat and free of any holes, cracks, or bumps. Apply primer and let it dry. Apply your first coat of paint. Use a small paint roller for the best results. Once you've got a smooth and dry first coat, add another one on top.

Add a simple frame. To finish your screen, you may want to add a simple black frame. The easiest way to add a frame to your painted screen is to use black velvet tape. The frame will help make your screen look completed and can also help improve picture quality as well. Add a strip of black velvet tape to each edge of the screen. Make sure the tape runs evenly and that your frame is level and straight. Check that the tape is lying smooth and flat against the wall.
Building a Fixed Screen with Wooden Frame

Find a good wall space. Make sure you have a wall with enough space to accommodate your finished screen. It should also have plenty of room for the screen to hang an appropriate distance from your projector, which depends on your projector model’s requirements.
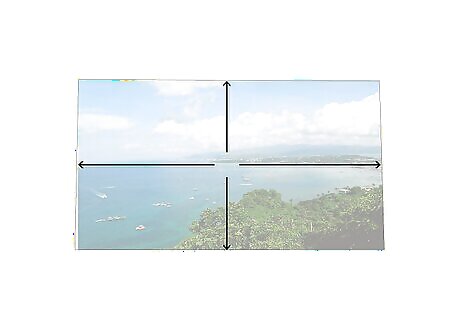
Measure your projector image. Turn your projector on and have it set to its test image. Measure the size of the image where you will be using your screen. Record both the width and the length of the screen. Measuring the image size that you plan on using will allow you to determine the final size of your projector screen.
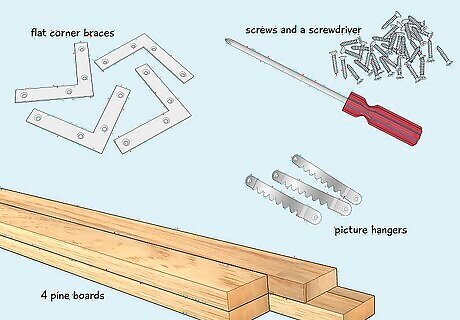
Choose your materials. The best types of projector screen materials are white blackout fabrics or any high contrast or high gain projector screen. Make sure you have enough fabric to cover your measured projection area, plus at least an extra 5 inches (130 mm) of screen material to attach to the back of your frame. You’ll also need the following materials: Four pine boards for the frame. Two will be longer and will run horizontally, and two shorter boards will be used for the vertical sides of the frame. Screws and a screwdriver. Flat corner braces. Three or four picture hangers. A level and pencil to mark guidelines.
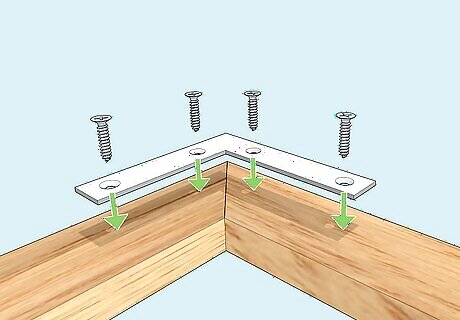
Build the frame. The frame will be the base upon which your projector screen will be fixed. Creating a square and level frame will help keep your screen flat, smooth, and optimized for using your projector on. Take the following steps to create the perfect frame: Cut your boards with a handsaw to the length you need if they are too long. Lay the frame out. Place a corner brace on each corner where the boards meet. Sink your screws into the wood through the corner braces. Check to see how stable your frame is. You can add additional braces if needed.

Attach your screen. Once your frame has been built, you can affix your projection screen material on and over it. Make sure you work slowly and carefully when attaching the screen to ensure that it properly covers the frame and is free from any wrinkles or dips that could affect picture quality. Lay your screen down flat on the floor. Place your frame on top of your screen and center it. Pull the extra screen material up and over the edge of the frame. Use a staple gun to staple the screen to the frame. Space your staples about ten inches apart. Keep the screen tight as you add staples, removing wrinkles as you go. Go around again and place staples every five inches.
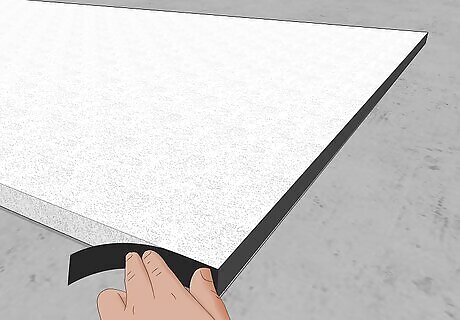
Add the finishing touches. Although your screen is technically ready to be used, you will want to add a few more elements to it. These last few additions will allow you to easily hang it on a wall and can help make the edges of the screen look clean and professional. Screw in regular picture hangers evenly along the top horizontal beam of your frame. You can try adding black artist’s tape to the edges of your screen to give it a nice stylistic finish. Adding a dark border can also help improve picture quality by cutting down on light reflection.
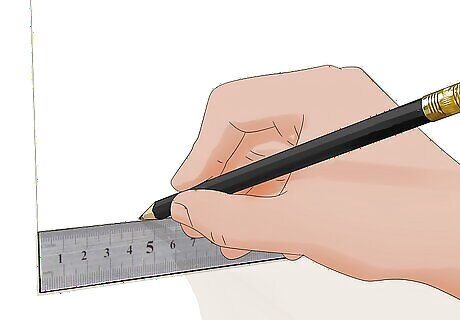
Draw your guidelines. Before you can hang your projector screen, you will need to make sure you are hanging it in the right place. Once you hang your projector screen, it won't be easy to reposition it, so take your time and be exact. Turn your projector's test image on. Use a pencil to lightly outline where the image is being projected. Use this guideline to help you hang your projector screen in just the right place.
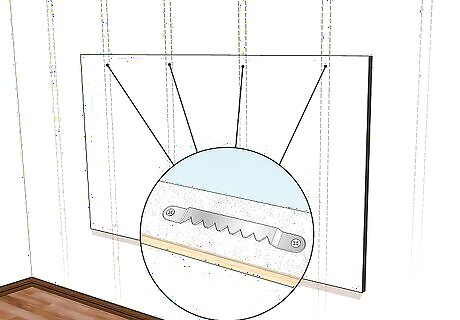
Mount your projector frame onto a wall. Use a stud finder to locate stable places on your wall to install the hanger screws and mark them with a pencil. Draw a level line between the points where you will be adding the hanger screws. Install the hanger screws using a screwdriver. Hang the projector screen and use a level to make sure the frame isn’t crooked. Place your screen in the exact position that you took your original screen measurements from to ensure that the projected image will fit. Once your screen is hung on the wall, it's time to sit back and enjoy your favorite films on it!
Making a Portable Screen with PVC Frame
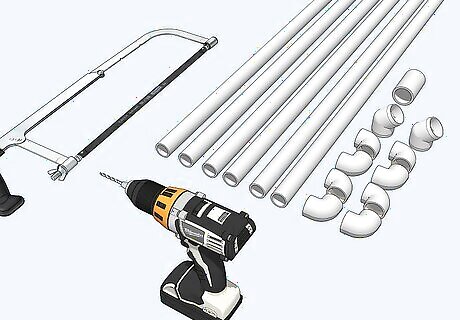
Gather your materials and tools. Building a portable projector screen can be a fun way to allow you to watch movies in any location that has electricity. The screen and frame will require you to purchase some easy-to-find materials from nearly any hardware store. Take a look at the following materials and tools that you will need to get started: A hacksaw or other tool to cut PVC pipes. PVC pipe glue 20 feet (6.1 m) heavy duty rope or cord. A drill to make holes in the PVC pipes. Six 10 feet (3.0 m) long sections of 1 inch (25 mm) diameter PVC pipes. Eight 1 inch (25 mm) diameter, 90 degree PVC elbows. Two 1 inch (25 mm) diameter, 45 degree PVC elbows. One straight connector Six 1 inch (25 mm) diameter T connectors Tape One 6 by 8 feet (1.8 m × 2.4 m) white tarp.

Cut the pipes. Use the hacksaw to carefully cut the pipes according to these measurements: Cut two pipes to be 8.5 feet (2.6 m) each. Cut two pipes to be 6.5 feet (2.0 m) each. Cut two pipes to be 6.25 feet (1.91 m) each. Save the PVC scraps from each cut.
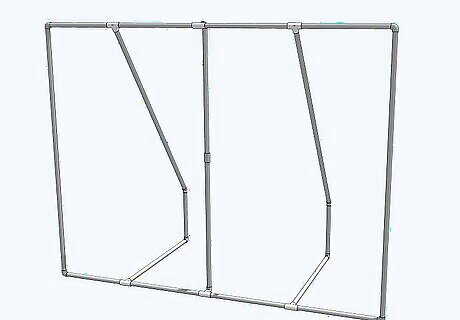
Build the frame. After you have all of your pieces assembled and your pipes cut to the length, you can begin assembling the screen. Follow this order of connections to build your frame: Connect the two 8.5 feet (2.6 m) pipes to the 6.5 feet (2.0 m) pipes using your 90 degree connectors. This builds the bottom rectangular base. Add three T-connecters to the 8.5 feet (2.6 m) pipes. They should be spaced two feet apart from each other and the corners. On the back of the base, place the 3.5 feet (1.1 m) pieces of pipes into the T-connectors closest to the corners. Put ninety degree elbows on these 3.5 feet (1.1 m) pipes and then add the 1.5 feet (0.46 m) piece out of them. Add a 45-degree elbow on the end of that pipe. From those 45 degree elbows, connect the 6.25 feet (1.91 m) pieces and connect them down to the front T-connectors. Use a straight connector to join the two 3.75 feet (1.14 m) pipes. Add a ninety-degree elbow to each end. Take a small 3 inches (76 mm) piece of pipe and join this long pipe to the center T-connectors.
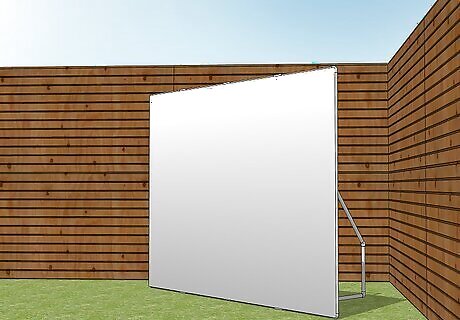
Attach the tarp. After your screen is set up, you can add your tarp to finish off your portable projector screen. Adding the tarp will require you to drill some holes in the pipe, run your cord through them, and attach the screen to the frame. Drill holes in the four corners of your frame and thread your cord through the holes. Pull the cord down the length of the frame, putting it through the eye holes of the tarp as you go. Tie the cords off to secure the screen in place. Set up your portable screen inside or outside, or move it around depending on your mood, weather, and how many people you have over!


Comments
0 comment