
The Five Lost Flea Locations
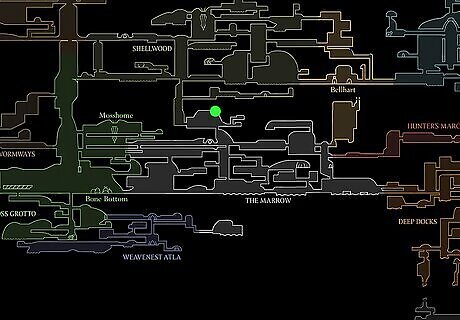
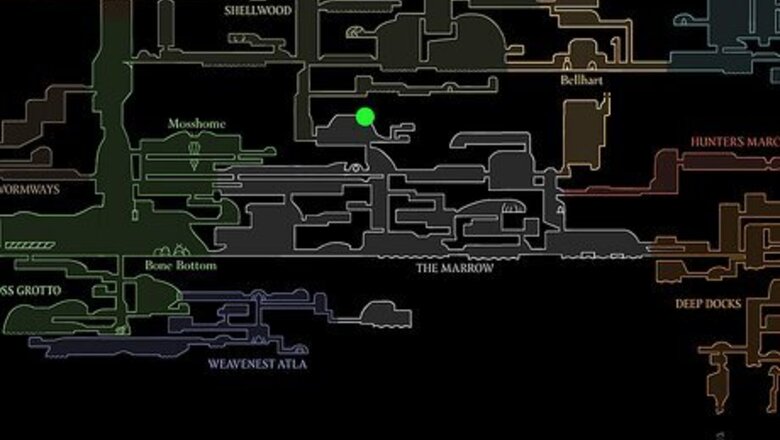
Flea #1: The Marrow Start at the northernmost bench in The Marrow. Go to the right and jump up. Avoid or fight the enemies and jump up from the spine-like landing to the chamber above. Complete the winding platforming path that leads you up as high as you can go (to the left, then the right), and the flea will be waiting for you in an alcove. Pro tip: Keep your audio on! The fleas make a cute little whimpering noise when you’re close. If you’ve been listening to a podcast in the background while playing Silksong, shut it off for this quest. Following the flea noises really helps.
Flea #2: Deep Docks Go to the fast travel point with Bell Beast. Run to your left, past the Beast, and destroy the fake wall on the left. Go through the opening, jump up the ledges, and you’ll find the Lost Flea.
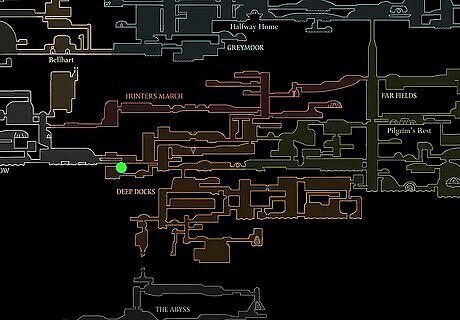
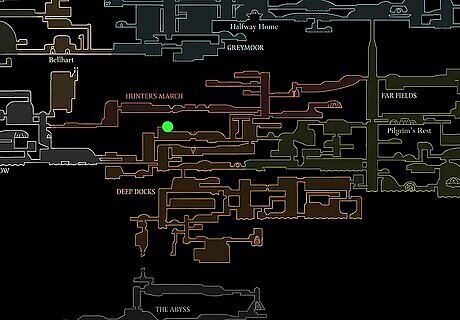
Flea #3: Deep Docks You must have the Swift Step ability unlocked to reach this flea. Start at the northernmost bench in the Deep Docks. Enter the room to the right and climb up. Use your dash ability to work your way to the platform at the top right where you’ll find a flea stuck in a little container. How do I get the Swift Step ability? The Swift Step ability is in Deep Docks, too! Drop from the northernmost bench and go right. At the end of the long, lava-covered section, go up and to the left. Complete the platforming challenge and you’ll find Swift Step.
Flea #4: Deep Docks You must have a Simple Key to unlock this flea. The last Deep Docks flea is behind the door that leads to the bottom right of Deep Docks. Open the door and follow the path to reach the last flea in the Deep Docks. Where do I get the Simple Key? There’s one for sale at the shop in your starting town.
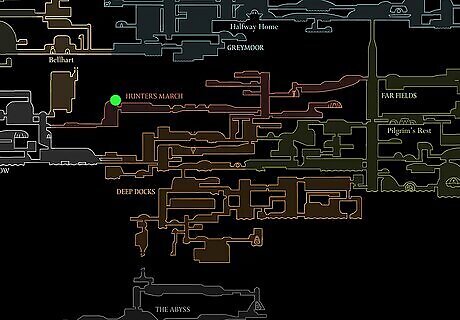
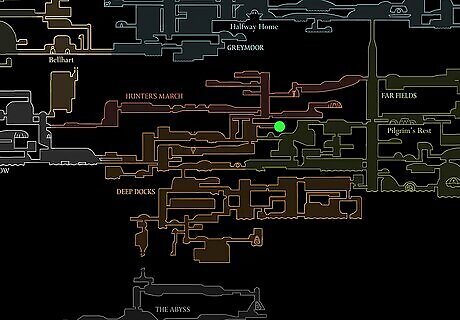
Flea #5: Hunter’s March Start at the easternmost bench in The Marrow. Jump up and enter the first hallway that leads right. Beat the ant-guy miniboss and head right until you can’t go any further. Then, jump up as far as you can. The flea is in the top right corner. You can get this flea before the fleas in Deep Docks if you want, but you have to beat a miniboss at the entrance to Hunter’s March. That fight is very hard without the Swift Step ability. If you cannot get this flea, Flea #6 is reachable in Far Fields. That’s a decent alternative if you don’t want to fight the miniboss.
Should you take the flea caravan?
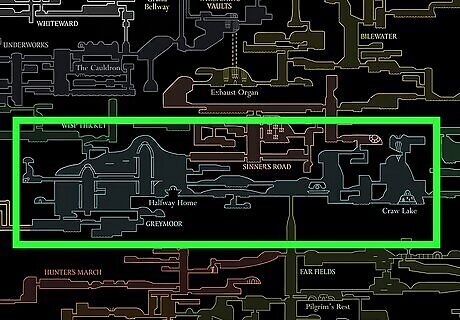
It depends on whether you want to explore or solve Greymoor quickly. There are two reliable ways to get to Greymoor: the flea caravan and the air ducts in the Far Fields. Here are the pros and cons of each option (also, to clarify, you will not lose out on anything by choosing one option over the other—this is entirely personal choice): Taking the flea caravan: If you’re not dying to 100% the game and you’re enjoying the adventure of exploring, you probably want to take the flea caravan. They’ll drop you off at the western-most entrance to Greymoor, so you can explore starting from the very start of the map. Going through Far Fields: If you’re a completionist, this is probably the ideal routeYou’ll enter right next to Shakra, who can sell you the map for Greymoor immediately. To find her, once you arrive in Greymoor, just go right. Drop down and you’ll find a bench with Shakra nearby. You do need the drifter’s cloak to use the air vents, so if you haven’t unlocked it yet, you’ll have to take the flea caravan if you want to get to Greymoor before finishing the Far Fields (which we don’t recommend—you’re best off finishing Far Fields first).
Remaining Flea Locations
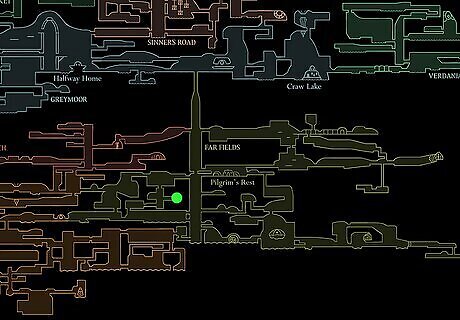
Flea #6: Far Fields Go to the largest corridor in the middle of Far Fields. The flea is in one of the lower corridors on the left (not the bottom-most, but just above it). You’ll get trapped and attacked on your way. Defeat the enemies, and the flea is behind them.

Flea #7: Far Fields This flea is pretty challenging to find. Start at the Bellway in Far Fields and go to the right. Squeeze through the hidden opening. Then, follow the wind currents using your Drifter’s Cloak. Pogo on the plants, avoid the spikes on the wall, and complete the platforming challenge. The flea is at the end of the path on the right. If you defeat the enemies on the left after getting the flea, you’ll unlock a shortcut back to the bench you probably need right now.
Flea #8: Greymoor Go all the way to the bottom right of Greymoor. In the area with the large balloons, jump up along the right side until you find the caged flea. Hit the lever at the bottom to open the cage and let the flea out.
Flea #9: Greymoor This flea has a name! He’s an NPC named Kratt, and freeing him will unlock a spa at the flea caravan. He’s in the middle of the map, at the top. He’s right below the entrance to Sinner’s Road.
Flea #10: Greymoor This scared little flea is hiding. He’s at the top of the tower on the left side of the map. The trick here is that you have to loop around from the right side of the map and pogo on the spikes to reach the flea.
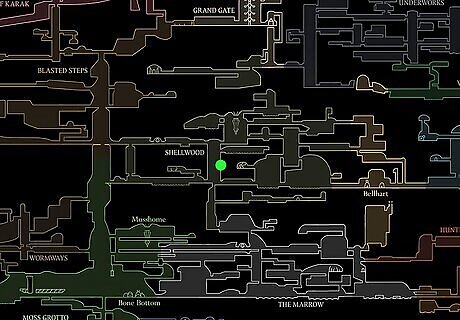
Flea #11:Shellwood Enter from Bone Bottom. At the first large room (there’s one before it, but you can’t access it until much later) with the white flowers, pogo up using the flowers and enter the room on the right side where the flea is hiding.

Flea #12: Bellhart Defeat the Sister Splinter boss in Shellwood to get the Cling Grip (wall climb) ability. After getting the Cling Grip, go to the exit on the right. This is a side passage to Bellhart (you may not have the map yet). Go to the top-left corner of the map, and you’ll find a flea hiding there.
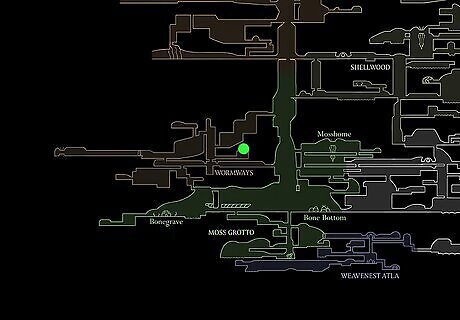
Flea #13: Wormways In the central vertical section of the map, look for a breakable wall on the right. Destroy it and enter the area. Inside, there’s a flea being carried in the mouth of a flying bug. Kill the bug and you’ll free the flea.
Flea #14: Blasted Sands This flea is tucked away in the column just to the left of the Bellway and bench at the top of the map. Climb to the top, and the flea is on the left.

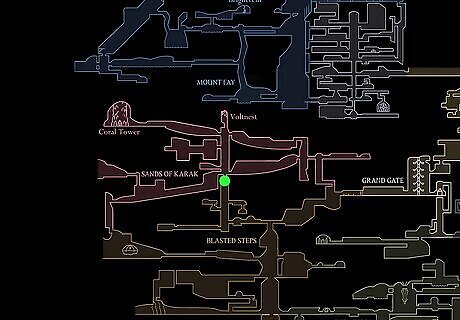
Flea #15: Sands of Karak After getting the flea in Blasted Steps, jump up into the Sands of Karak and go right. The flea is above you on a platform. Spawn the tree branches, jump on them, and pogo your way up to the flea. The poor thing is stuck in spikes!
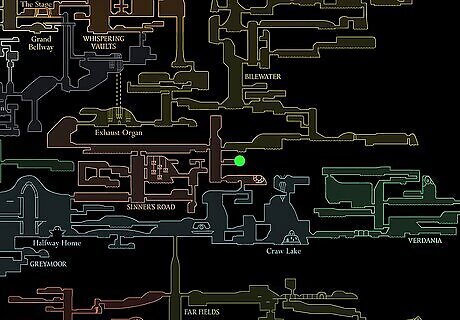
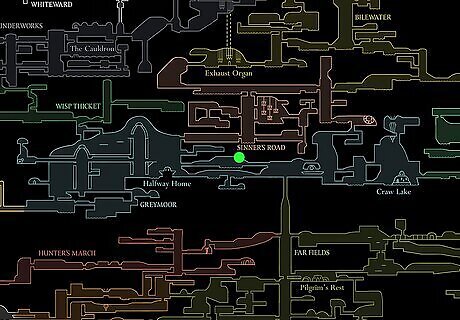
Flea #16: Sinner’s Road All the way in the bottom right of Sinner’s Road, there’s a bench. From there, go left to the vertical column. Jump up halfway and look for an alcove on the right. You’ll find a flea trapped in a cage. Destroy the cage to free the flea.
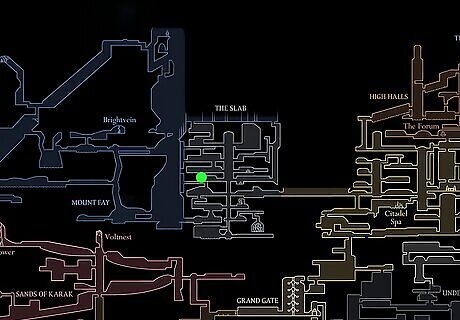
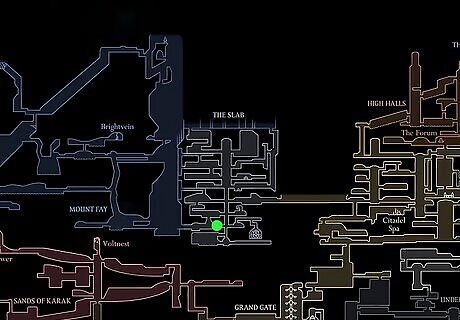
Flea #17: The Slab Reaching The Slab is a bit of a nightmare (you have to be captured by Wardenfly in Deep Docks or go left from the Choral Chamber after you reach the Citadel), so this is the first point on our list where you can feel free to deviate from the order. There are two fleas here. The first is to the bottom left of the main central chamber. Look for a door and enter it. The flea is hiding inside.
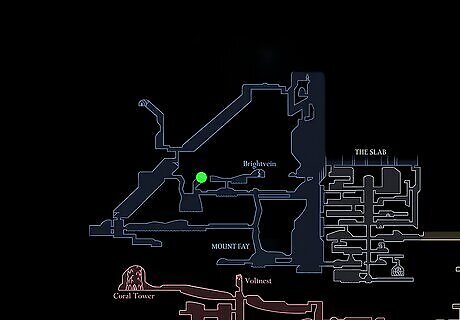
Flea #18: Mount Fay Grab the double jump ability while you’re here. It’s at the peak of the mountain, so just keep going up. Once you unlock the ability, go back down to the horizontal area in the middle of the map. On the leftmost side of this area, look up for a fake ceiling. Break it, use your double jump to get up there, and free the flea.
Flea #19: The Slab The second flea in The Slab is sort of directly below the first one (if you draw a straight line down and ignore the shape of the map). Come back from Mount Fay with the double jump look up. Double jump your way up the corridors until you stumble on the flea.
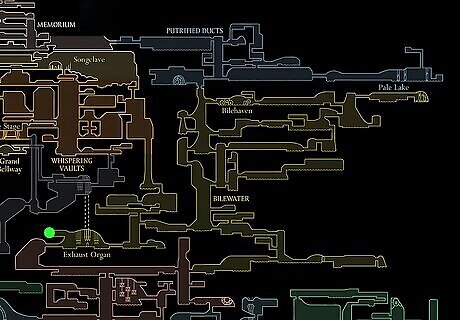
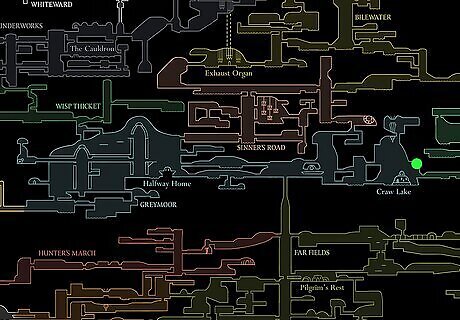
Flea #20: Bilewater Enter Bilewater from Sinner’s Road. The flea is directly above you in a little hidden alcove, but you have to enter the Exhaust Organ area to get there. Complete the platforming section, and once you exit the Organ, go to the left. The flea is right there.

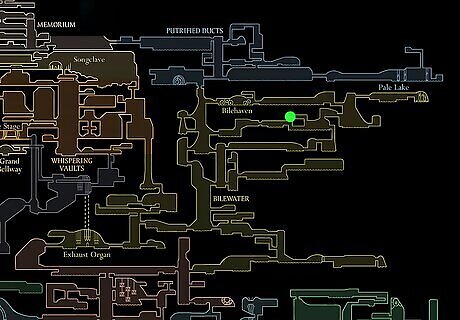
Flea #21: Bilewater Go to the lower right section of the map and fall halfway down the large vertical shaft. The flea is in a room on the left, surrounded by enemies. Kill them to free the flea.
Flea #22: Bilewater From the northernmost bench, go right until the hallway empties out into a large chamber. Go up the path on the left and fall down again. In this room, the flea is in the top left. Break the fake ceiling and jump up to the left to find the flea.
Flea #23: Choral Chamber Go to the leftmost vertical chamber (not at the bottom, in the middle of the map). Jump up halfway and enter the room on the right with a bunch of spikes and a moving platform. Work your way all the way to the right and break the cage to free the flea.
Flea #24: Choral Chamber The second Choral Chamber flea is pretty close to the first one. Go back to the leftmost column and work your way to the top. Go right and fall down halfway through the vertical chamber. In the first entrance on the right, break the fake wall. Ride the wind column up to the second flea.
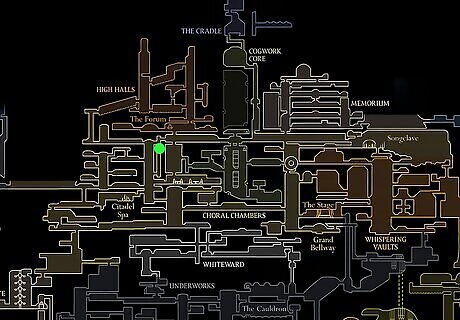
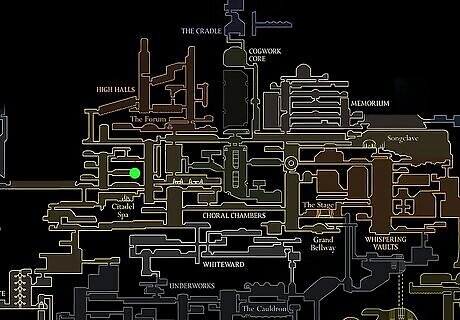
Flea #25: Whispering Vaults Enter from the topmost entrance of the Choral Chambers. Go all the way to the right and fall down the largest vertical column in the middle of the map. Stick to the left and enter the first entrance you come across. The flea is at the very top of this platforming room.
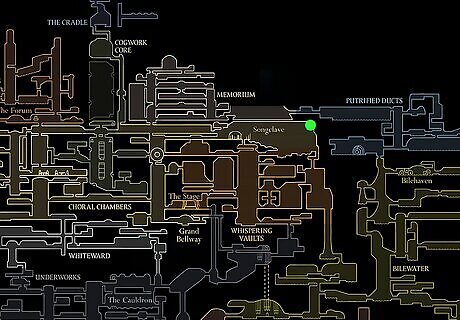
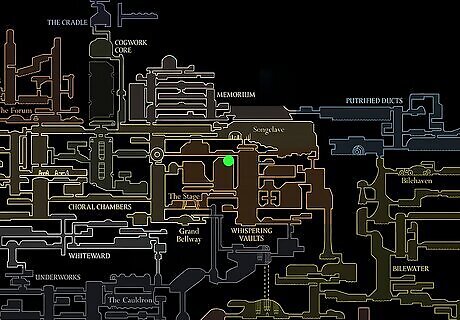
Flea #26: Whispering Vaults/Songclave Go back to the large central chamber and drop down. Enter the entrance second from the top on the right side of the chamber. Go right, then look for a wall with cracks in it. Break that and take the air vent up. Enter the Songclave and go all the way to the top right to find the flea. If you haven’t unlocked the wind current in this room yet, fall to the right side of the chamber and look for a plate. Strike the device multiple times to open the air vent. You cannot get this flea by starting in Songclave—you have to enter the Songclave from the hidden passage in the Whispering Vaults.
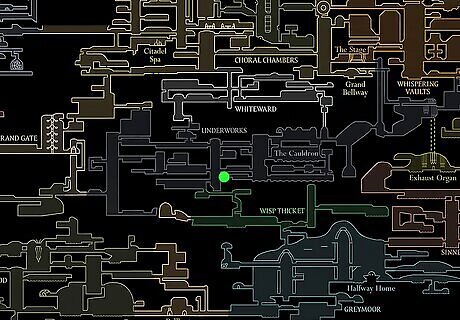
Flea #27: Underworks Drop down from either side of The Cauldron (on the right side of the Underworks). Go left through the lava-covered platforming area until you cannot go left any further. Jump up to the left, and the flea is inside of the room. This flea looks like it’s really close to the central elevator in Underworks if you refer to a map, but you can’t actually get to this flea from that side. You have to come from the right.
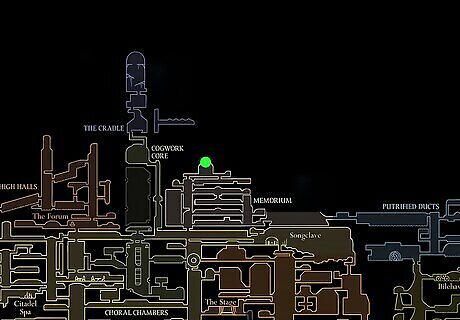
Flea #28: Memorium This flea is actually a miniboss, so come ready to fight. Make your way all the way to the very top of the Memorium map. The flea is in the dome at the top. The fight itself is very easy; you just pogo on him whenever he does his dash attack. Once you beat him, he’ll join the caravan.
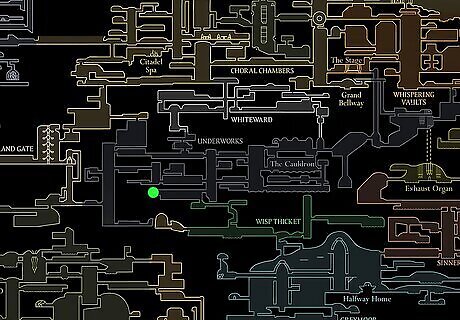
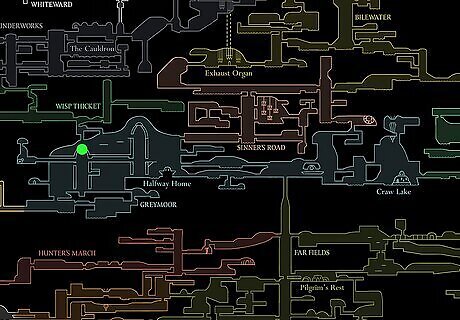
Flea #29: Wisp Thicket/Underworks Start at the Wisp Thicket bench (there’s only one). Go left until you reach the water and jump up through the opening in the top. Fight your way through the tunnel, and you’ll reach a fork. Go left, then up, to enter a hidden portion of the Underworks. The flea is in the top left of this room. The platforming required to do this is very difficult, so we highly recommend not trying to do this without saving your game at the Wisp Thicket bench first. You cannot reach this flea from the Underworks directly. You have to go through the Wisp Thicket.
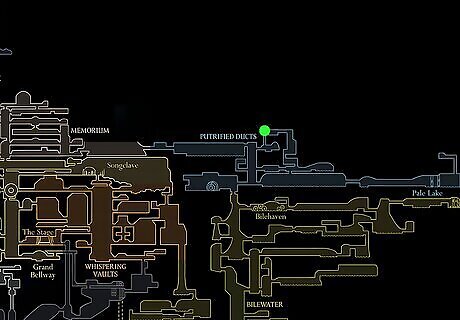
Flea #30: Putrefied Ducts The very last flea has a name—Vog! Go to the biggest horizontal corridor at the bottom of the map (it’s just to the right of the main central column). Go to your right until you find a breakable wall near the center of the room. Break it, and hop up on ledges to the top. An enemy will pull you up, leading you to a secret path. Keep going up the secret path, allowing the vine enemies to pull you up without letting them kill you. You’ll find Vog at the room at the end. Vog will join the flea caravan after a small interaction, and the caravan itself will actually move to the Putrefied Ducts.


Comments
0 comment