
Hanging a Rug with a Curtain Rod and Casing
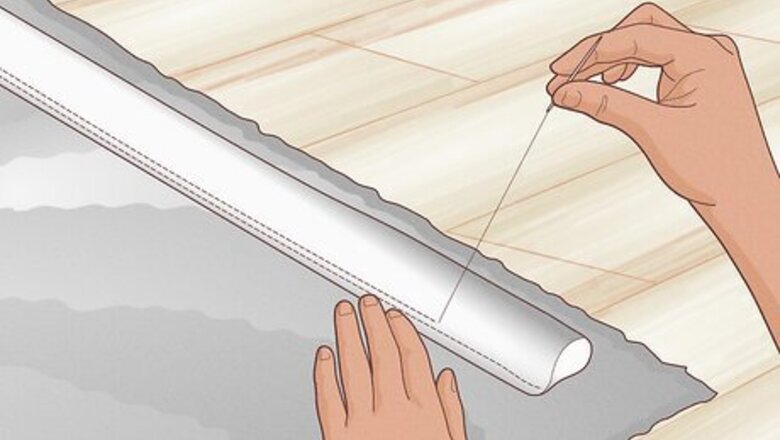
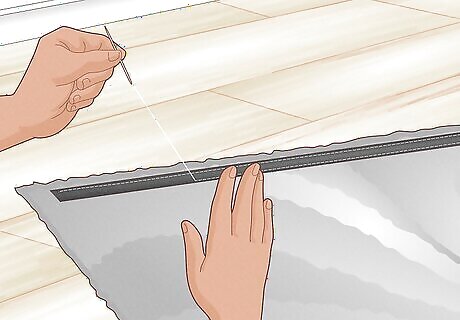
Hand sew a tube of sturdy fabric along the back of the rug. This tube is known as a casing, which is a long-banded strip of fabric a curtain rod is inserted into to hold up your rug. Line a sturdy fabric (such as heavy cotton, linen, or cotton twill rug binding) up with the top edge of the back of your rug. Then, cut it so it’s about the same length across. Align your curtain rod with the same edge and wrap the fabric around it so it fits snugly. Mark that location on each side of the fabric with pins or ink. This will be the line you sew to create the tube. Be sure to sew in a straight line to prevent sagging. When measuring the casing against the rug, leave a bit of space on either side of the rug to allow room for the ends of the rod to stick out. You need this space so you can hang the rug. The amount of space left on each edge of the rug will vary depending on the size of the rug, but it should be at least one or two inches. This method evenly distributes the weight of the rug and provides one of the most secure and safe ways to display your rug. Hanging this way can work for any size or height rug, but is best for heavier rugs. You can use old scrap fabric to create the casing, or if you don’t have anything sturdy enough, buy some from the craft store. Measure how much you’ll need first, and get a little extra in case you mess up. Use heavy cotton button-hole thread and try to catch at least two warp threads in each stitch to ensure a good support for the rug. Warp threads are the ones found tightly stretched lengthwise on a rug and are made of stronger, coarser fibers than weft threads. If your rug is an antique or high-value, first sew a piece of muslin or heavy cotton to the rug to run under the casing. This prevents the rod from coming into contact with the rug and causing damage.
Insert the rod into the casing. Simply slide it through the tube created by the casing. The rod must be sturdy enough to support the rug’s weight without bowing in the middle. Choose a shorter rod if you want to hide the rod and the brackets, or choose a longer one and cap its ends with ornamental finials for a decorative look. Before you slip the rod into the newly sewn casing, paint the wood or metal to prevent the rod from damaging the casing or rug with acids or rust.
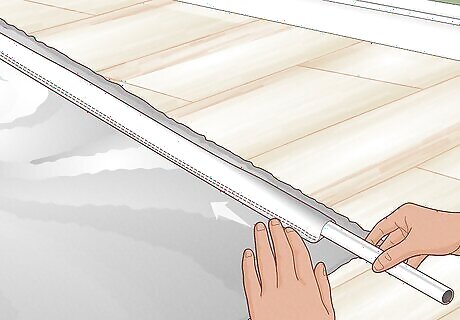
Screw brackets into the wall and hang the rug. The curtain rod should come with a mounting kit that includes hooks and screws. Determine where you want to hang the rug and measure the length of the rod, as the ends of each side will be mounted onto the brackets. Then, use a screwdriver or power drill to affix the brackets to the wall and hang your rug. For best results, use a tape measure and mark the location of the two ends of the rod on the wall. Before drilling the mounts into the wall, use a leveler to make sure the two hooks are even. If your rug is heavier, you will probably need a sturdier hook to hang it on. When hanging a heavy rug, place the hooks along the studs in the wall for added support. You can easily find the studs in your wall with a stud finder. After detecting the studs, center the rug along two studs and attach the hooks to the studs. If you are attaching the hooks to studs, you may need to sew multiple canvas casing strips into the back of your rug, leaving a small exposed space for the rod to rest on the hook since the hooks may not be at the end of the rod. You’ll cut and sew them the same way, just leaving an inch or two between them.
Hanging a Rug with Velcro
Attach Velcro strips to the back of the rug. Velcro tape consists of 2 strips: the hook tape and the loop tape. The hook tape is the rough part, and the loop tape is the fuzzy part. Sew the loop tape onto the top edge of the back side of your rug. To avoid damaging a high-value or sentimental rug, use a strip of plain, unbleached muslin or canvas that is slightly wider than the Velcro strips. Stitch the loop tape into the muslin first, and then sew the muslin to the rug. If your rug is handmade, hand sew the muslin using a whip stitch to avoid damage. To hide the stitching, use a heavy cotton thread in a similar color as your rug and stitch between the rug fibers. Many museums use the Velcro method to hang area rugs, and it can be used on heavy-weight rugs without causing damage.
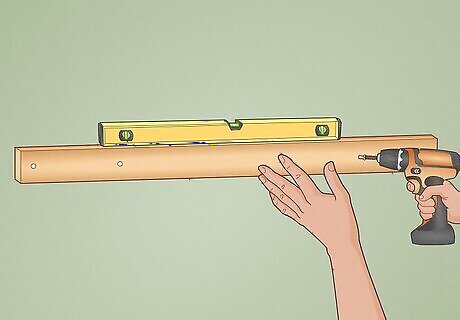
Measure and mount a thin piece of wood on the wall. With a tape measurer, ensure the length of the wood (like a wood lath or mounting board) equals that of the rug. Use a saw to cut the wood down to size if necessary and mount the wood to the wall. One of the best methods to do so is to screw the wood into the studs behind the drywall. Use a leveler when mounting the wood to ensure your rug hangs straight.
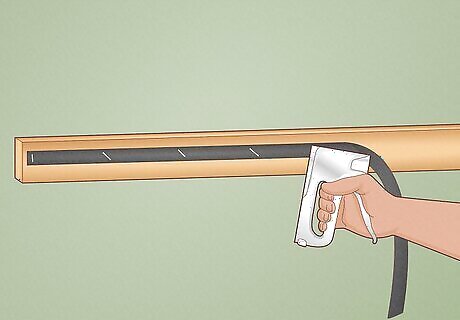
Staple the hook tape to the wood. You can staple the hook tape either before or after mounting the wood. Use a staple gun to secure the hook tape. Note that raw, untreated wood should never come in contact with your rug. The canvas or muslin strip will protect your rug if you chose to add it, and if you didn’t, be sure the wood has been sealed before using it. For large, heavy-weight rugs, this process may need to be repeated a few times to bear the weight. In this case, hang 3 or 4 pieces of wood that are stacked vertically every few feet. Attach the velcro the same way, and measure the distance between the pieces to ensure you place the loop tape in the correct spot on the rug. Alternatively, attach velcro strips around the perimeter of the rug. This requires extreme precision when measuring and placing the wood to avoid buckling or stretching the rug.

Press the Velcro together to hang the rug. Line the rug up with the piece or pieces of wood and press firmly to connect the Velcro. Smooth the rug out to ensure there are no wrinkles or creases. If you aren’t comfortable doing this process yourself, talk to a professional to get a quote on having it done for you.
Hanging a Rug with Clips

Affix rug clips across the top of your rug. Rug clips are the easiest way to hang a rug without having to attach permanent loops or casing; they’re simply clips that are used to hang and display area rugs or small carpets on the wall. Purchase your preferred style of rug clips from a hardware store and space them evenly across the top of the rug. Any style of rug clips should work, so the style you choose can be based on your aesthetic preferences. The exact number of clips you’ll need depends on the size and weight of the rug. Since clips aren’t permanent, play around with the number and spacing until you find what works best for your rug.

Attach the clips to the wall and hang your rug. Some rug clips come with brackets that can be screwed directly into the wall, while others have rings that need to be looped over a curtain rod. If you have the former, follow the instructions provided with the clips to install them properly. If you have the latter, measure the length of the rod to determine where to attach the brackets to the wall. Screw the brackets in, then hang your rug. Over time, the weight of the rug might become unevenly distributed causing it to appear misshapen. Simply adjust the clips and the rug to better support the weight. Use a leveler to ensure you don’t hang the rug at a crooked angle.
Hanging a Rug with Cloth Hooks
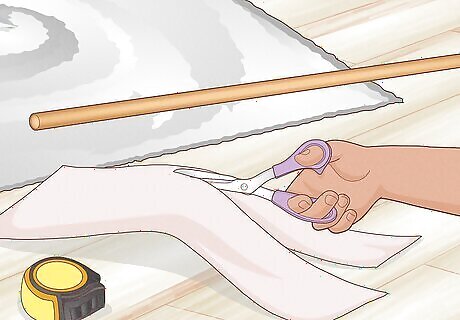
Measure and cut the fabric for your hooks. These hooks will be small pieces of fabric sewn onto the back of a rug to hold a rod or dowel in place so you can mount it on the wall. Cut several pieces of fabric into rectangles about two-thirds wider than the width of the rod or dowel you’ll use to hang the rug. To find the length of the hooks, wrap the fabric around the rod. Press the fabric snugly around the rod with your finger. There should be an inch or two between the top of the hook and where the fabric fits snugly against the rod. Then, fold the pieces of fabric vertically into thirds so they can be sewn into thin, strong loops to hold the rod. The cloth hooks should be made with strong fabrics, such as heavy cotton, linen, or cotton twill rug binding. The exact number of hooks you need depends on how large and heavy your rug is.
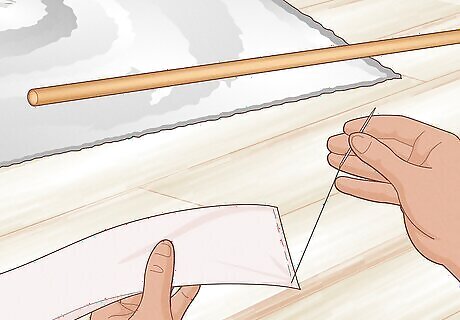
Fold the pieces of fabric in half horizontally and sew the ends together. Before sewing, slip the rod into each hook to make sure it fits. At this stage, the hook will be loose around the rod. Sew the ends of the hooks together so they form loops, then, with the rod still inside the hooks, press the fabric snugly around it. Mark this line on the hook with a pen or marker, as this is the line you’ll sew when attaching the hooks to the back of the rug. It ensures you’ll have enough space to reinsert the rod. Remove the rod after this step so you can sew the hooks to the rug.
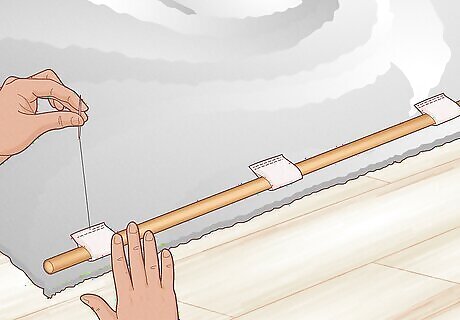
Hand sew the hooks into the rug. Mark the locations on the top of the back of the rug where you want to attach the hooks. Make sure to place them close enough together that the weight of the rug is adequately supported; this is usually a couple of inches, though it could vary depending on the size and weight of the rug. Then, hand sew the hooks along the marked lines you made in the previous step. Be sure you only sew into the back of the rug so that the stitch doesn’t show on the front. Use straight pins to hold the hooks into place before sewing. The hook should be positioned toward the top of the rug, while the sewn edge should be positioned toward the interior of the rug. When you hang the rug, the hook should not be folded over itself. After sewing, slip the rod into the hooks to make sure it fits properly. The fit should be snug, but you shouldn’t have any difficulty.
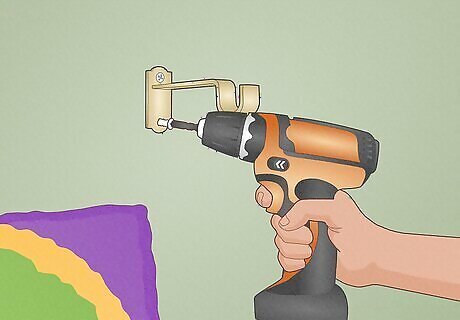
Mount the rod hooks onto the wall and hang the rug. Most rods come with mounting hardware that can be attached to the wall with a couple of screws. Determine where you want to hang the rug, then measure the length of the rod so the mounts are aligned with each end. Use a screwdriver or a drill to attach the mounts and hang your rug on the wall. For the best results, mark the placement of one of the rug mounts. Use a tape measure to measure the length of the rug and mark that location on the wall. Before drilling, use a leveler to ensure the 2 hooks are even. If you want to secure the bottom of the rug, follow the same steps to sew hooks into the bottom and attach the rod mounts to the wall.
Hanging a Rug with Tack Strips

Measure 4 tack strips against each side of the rug. Tack strips are thin boards with sharp tacks sticking out of them that are typically used to hold carpet in place. Use a tape measure to determine how long each side of the rug is, then cut the tack strips to the appropriate length using a small handsaw or wood snips. Coat the tack strips in a clear finish or with paint and let dry. This ensures that no acid from the wooden tack strips can damage the back of the rug once it is hanging. Tack strips can be purchased from most home improvement stores.
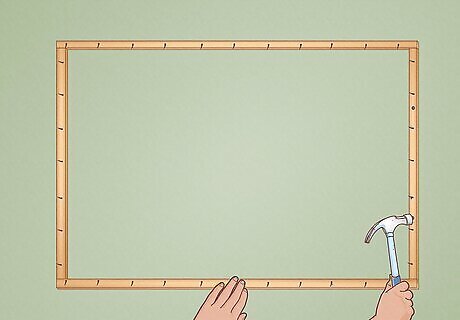
Nail the tack strips to the wall. Use a leveler to ensure the tack strip is straight. Then, hammer the side without the tacks into the wall where you want to hang the rug. Your tack strip should have longer nails on the side that goes into the wall instead of tacks. Repeat this process for the remaining tack strips, lining them up with each edge of the rug. When you’re done, the 4 tack strips should form the outline of your rug. If you’re hanging a heavy rug, the nails should line up with studs behind the wall. Use a stud finder to easily locate the studs.

Nail the rug to the tack strip. Lift the rug against the top tack strip and press it firmly against it. Use two upholstery nails to secure each corner of the rug, and then use a third nail to secure the middle. Nail through the rug and into the mounted tack strip. Hammer the upholstery nails into each edge, starting with the sides first and saving the bottom last. The upholstery nails are both functional and decorative. They secure the rug to the tack strip and can look very fancy depending on the upholstery nails that are chosen.
Hanging a Rug with a Quilt Hanger
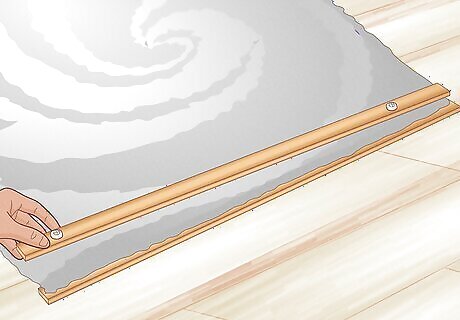
Place the top edge of the rug between the quilt hanger. A quilt hanger is a frame consisting of two planks (usually wooden) on top and two on the bottom. Unscrew the top pieces and position the top edge of the rug between them, just below the holes for the screws. A quilt hanger is great for hanging lightweight rugs. The bottom is optional, and most people choose to hang rugs with only the top frame. Some quilt hangers have an indent where you line the rug or quilt up. The screws go through the back of the frame, so make sure you position your rug so it faces the right way.
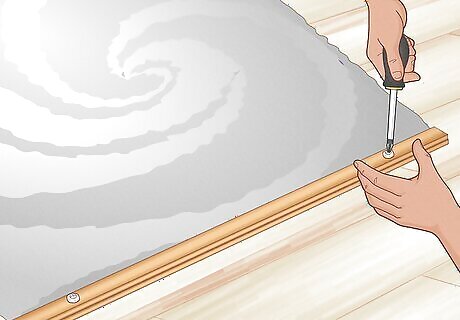
Screw the planks together. Use a screwdriver or Allen wrench depending on your frame and tighten the planks until they’re firmly attached. The screws enter through the back frame and go halfway into the front frame, which has special receivers. The screws will not go through your rug. Once tightened, the planks press down onto the fabric to hold it flat and even. If you choose to attach the bottom planks, follow the same process.

Hang your rug on the wall. Depending on the type of quilt hanger you use, it will either hang with sawtooth hardware or a rope attached to a mount. Follow the instructions provided with your hanger to install the hardware and line it up with the studs in your wall. The length of the rope can be adjusted and tied at your preferred length.


Comments
0 comment