
X
Research source
This creates a “spongy” feeling when you press the brakes. Getting the air out of the brake fluid column will restore the full strength of the hydraulic brakes. However, if your car has ABS (antilock brake system) brakes, you will need to have a professional mechanic bleed the brakes as they will use a special scan tool to cycle the pump and valves.
Preparing to Bleed the Brakes
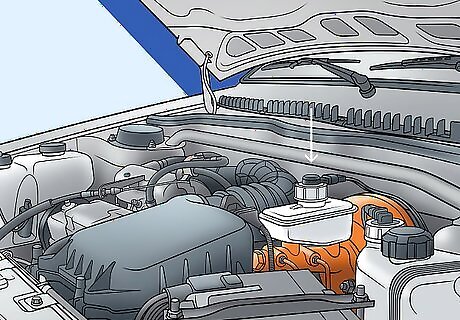
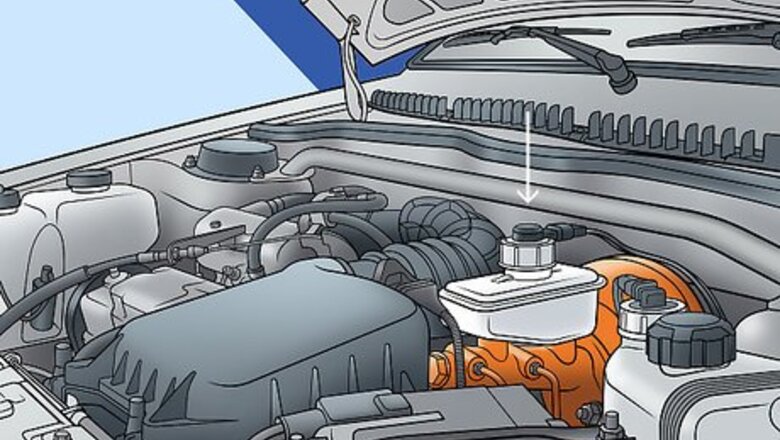
Remove the top of the master cylinder reservoir. It is usually a light-colored reservoir with a black cap in line with your brake pedal in the engine compartment. Consult your manual or a mechanic if you need additional help finding it. During a typical oil change, a mechanic will check the other fluids in your car. Simply ask next time you get an oil change done to find out where the reservoir is.
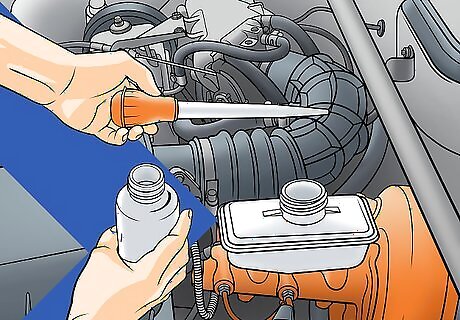
Draw out the old fluid. Using a clean turkey baster, suck out as much of the old, inky fluid as you can. Collect the old fluid in a jar or bottle that you can later label as old brake fluid. This will ensure only clean fluid gets pumped into the lines while you work. Labeling containers is the safest way to ensure it does not accidentally get used again. Be sure to recycle your old brake fluid. Consult your local government to see where you can drop it off.

Clean the reservoir. After you've gotten all the old brake fluid out, clean any sediment out of the reservoir, if accessible, with a clean, lint-free rag. Don’t let the rag fall completely into the reservoir though, as it will be a nuisance to get back out. Clean up any spilled fluid with a brake cleaner fluid or soap and water.

Fill the master cylinder with clean brake fluid. You will be able to see the fill line in or on the reservoir as you fill. You will do this periodically to make sure no air is being pulled in from the reservoir side during the bleeding process. If the fluid gets to about half-full, you need to refill it.
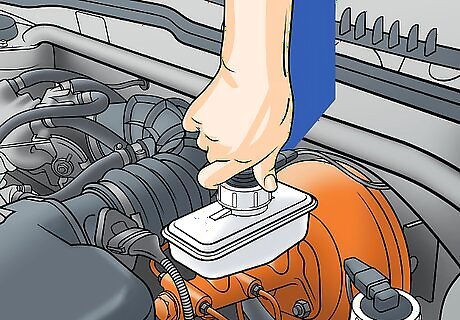
Replace the top of the master cylinder reservoir. Make sure to put the cap back on the reservoir and tighten to the right after each filling. Negative pressure in the lines during bleeding can cause fluid to shoot out of the reservoir if it is open.

Pump the brake pedal about 15 times then hold the brakes with pressure. This is simply going to charge the lines with the new brake fluid. It has not yet removed any air in the lines, but it will make sure the pressure is there for when you begin to bleed the lines.

Prepare the bleeder valves. Check your car’s manual to find the exact location of the valves. They are typically behind the brake system of each tire, and you may need to remove the tires to get access. Bleeder valves look different for different types of brakes, but they are typically a hex bolt shape with a nozzle-type extension off the front. A web search for your car’s model may help you identify them specifically. Using a box-end wrench (often ⁄16 inch (7.9 mm)) that fits the bleeder bolt, check that you can loosen the bleeder valves. Leave them closed though. A little oil drizzled or sprayed on the bolts the day before will help to loosen them. If the oil does not help, seek professional help. Breaking a bleeder valve will cause some costly damage. Do not use a crescent wrench. You do not want to strip the valve, rounding the edges to loosen and tighten again.
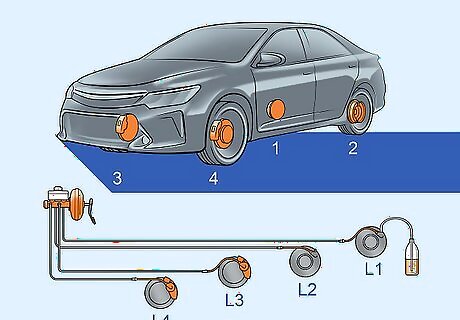
Consult your manual to determine the order of the wheels to bleed. If you cannot find the information in the manual or online, do not fear. Work from the furthest tire from the reservoir to the nearest tire. This makes sure that the air is gradually bled from furthest down the line until there is none left.
Bleeding Each of the Car Brake Lines
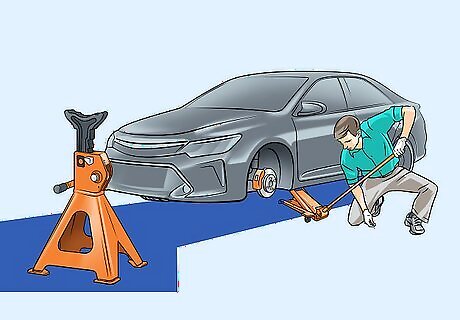
Jack up your car when you’re ready to start. Getting the car off the ground will give you easier access to the bleeder screws. Be especially cautious that the wheels are blocked and on stands before getting underneath the vehicle. After parking on a flat surface and chocking the wheels, use the jack at each tire (making sure they jack is on the frame, not the paneling). Place a jack stand under the frame after lifting each section to keep the car in the air. Have your assistant get into the car now before you get underneath the car. That way if any rocking occurs, you will both be safe.

Put a 1 by 4 in (25 by 102 mm) piece of lumber under the brake pedal. You can use an alternative spacer, if necessary. This will prevent the pedal from traveling too close to the floor as you begin to bleed the brakes. This is needed so you do not bottom out pistons in the master cylinder and cause internal master cylinder leakage.

Hook a tube to the bleeder bolt of the tire furthest from the reservoir. Using a piece of clear plastic tubing (aquarium tubing works fine), push one end of the tube over the brake bleeder bolt. It doesn’t have to be a perfect fit, but it will help keep things cleaner if it is.
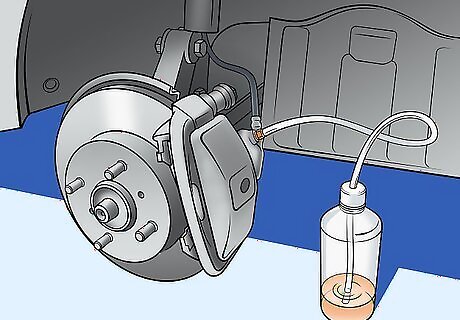
Put the other end of the tube into a jar filled with clean brake fluid. You only need about 2 to 3 inches (51 to 76 mm) of brake fluid in the jar. This will keep air from being sucked back into the brake cylinder or lines. You can also see air bubbles as the air is flushed from the lines. If you do not see air bubbles, don’t worry. They may be dispersing somewhere else. At the very least, you will be clearing the old brake fluid out.

Have your helper press and hold the brake. Call “down” to your assistant who then presses the brake pedal, holds it, and call “down” back. The force should be equivalent to coming to a slow stop at a stop sign. The calling back and forth will ensure you are both certain that the brake is pressed or not when it needs to be.
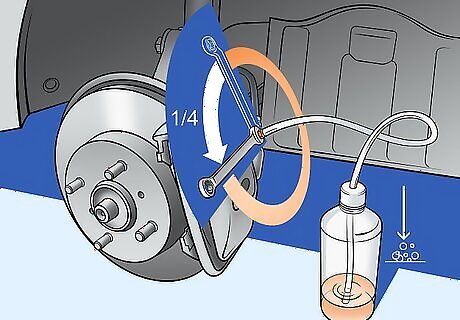
Turn the bleeder bolt to the left one quarter-turn. Old fluid and air will go down the tubing into the bottle. You will be able to see the trickle down the line and into the jar. Note: Warn your helper that the brake pedal they are pressing down will sink down as you unlock the bleeder bolt a quarter turn. This is perfectly natural, and your helper needs to keep pressure until it stops and hold it down.

Close the bleeder valve when the trickling stops. Just like you opened it, but in reverse, turn the valve a quarter turn to the right. Closing the valve now ensures that while the pressure is pushing outward, nothing is going to be sucked back into the line when the brake is released.

Ask your helper to release the brake. Call "up" to your helper, who now will lift off the brake and call “up” back to you. This completes one cycle of bleeding that particular line. Your brakes are a little closer to being cleared and clean. It can take up to 8 or 10 cycles to fully clear the line, especially for the further away tires.
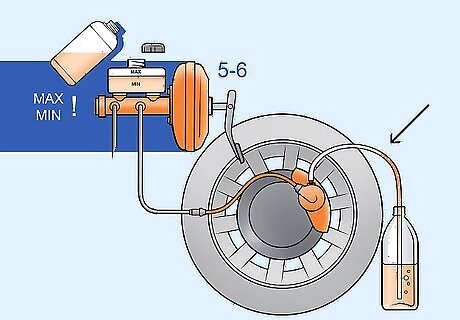
Repeat this process until new, clear fluid comes from the bleeder tube. After every 5 or 6 times through the cycle, top off the master cylinder reservoir with fresh fluid. Never let the reservoir get too low, or air will be sucked into the master cylinder.

Repeat the process on the other brakes. Move to the next furthest wheel from the reservoir and repeat the process with your partner. Be sure to bleed the brakes at all 4 tires. If you only do a few, you may only move the air bubbles to a different line or section.


Comments
0 comment